Lip augmentation has matured from a trend into a nuanced craft. The goal is not just bigger lips, but balanced proportions, hydrated tissue, and a mouth that suits the face at rest and in motion. If you keep seeing “lip filler 1ml” on treatment menus and aren’t sure whether that’s the right starting point, you’re not alone. One milliliter is the most commonly quoted volume, yet the best choice depends on lip anatomy, filler type, and your tolerance for swelling and downtime. I have treated clients who were thrilled with 0.5ml and those who wore 1.5ml beautifully. The difference came down to structure, skin quality, and a shared plan.
This guide lays out what 1ml of lip filler can realistically do, who tends to benefit, what the appointment feels like, and how the swelling stages unfold. You will find practical detail to support an informed decision, whether you are new to lip fillers or considering a top up.
What 1ml Actually Means
One milliliter is a unit of volume, not a guarantee of size. Imagine a small, flexible gel capsule, placed strategically into the lips. The product is typically a hyaluronic acid gel, which integrates with tissue and attracts water. The thickness of that gel, called G’ (elasticity), and the way it is placed will influence both lip filler results and how the lips feel.
With techniques that respect anatomy, 1ml can create a noticeable yet natural look for many first-timers. On thin lips, 1ml often restores the vermilion border, defines the cupid’s bow, and adds subtle projection without looking overfilled. On medium to fuller lips, 1ml refines shape, smooths lines, and corrects asymmetry. If someone comes in with a photo of a dramatic, celebrity-style pout and has a naturally flat profile or tight skin, 1ml in a single sitting may not achieve that look safely. Building in stages is smarter.
The other variable is swelling. Immediately after lip filler injections, 1ml can look like two or even three because of fluid shifts, microtrauma, and sometimes lidocaine in the product. Plan on a temporary overshoot.
Who 1ml Is Usually Right For
When clients ask about the best lip filler volume for a first treatment, I look beyond the number to three questions. How much space do we have in the lip to safely hold filler without migration or stiffness. What result are you imagining in movement and at rest. What does the rest of your face communicate, especially your nose, chin, and teeth display.
For most beginners seeking a natural look, 0.5ml to 1ml covers the majority of goals. Here is how I think about matching volume to needs in plain terms.
- Subtle enhancement for thin lips, better lip line definition, softening vertical “smoker’s lines,” or balancing a slightly uneven lip: 0.5ml to 1ml. If you are cautious about swelling, start at 0.5ml and top up after four to eight weeks. Noticeable volume increase with maintained definition, a more pronounced cupid’s bow, and a healthy, hydrated look: 1ml. This is the everyday sweet spot for lip filler natural results when you want visible but not “done.” Structured correction for asymmetry, previous filler correction, or shape reconstruction after dissolving: 1ml, sometimes staged with a touch up. Structural work can use more product without appearing large because some volume “disappears” into support.
Edge cases exist. If you have very flat, tight lips with strong perioral muscle activity, 1ml may look like a lot for three days, then settle into a gentle enhancement. If you have soft, stretchy tissue and already full lips, 1ml can look extremely plush, even too much. This is why a lip filler consultation with photos and a mirror in hand matters more than a default number.
A quick word on lip filler types and techniques
Not all gels behave the same. Hyaluronic acid fillers come in families with different particle sizes and crosslinking. Softer, more spreadable gels suit lip hydration and fine lines. Medium elastic gels hold shape for lip border definition and lift. Firmer gels can enhance projection in careful hands but may feel less natural if overused. A skilled injector will choose the filler based on your lip quality and goals, not simply brand loyalty. If you want a glossy, hydrated sheen without much size change, a low-density HA can do that with 0.5ml. If you want crisp edges and improved cupid’s bow columns, a medium elasticity gel is more likely.
Lip filler techniques also shape outcomes. Classic linear threading along the vermilion border defines edges. Pillaring or tenting can support vertical height. Micro-aliquots directly into the body add pillowy softness. Cannula can reduce bruising for some areas, while a needle can place product with more precision in others. Good work mixes approaches, rather than relying on a single technique.
Lip filler 1ml vs 0.5ml, lip flip, and Botox
A common comparison is lip filler vs lip flip. A lip flip uses a small dose of botulinum toxin along the upper lip muscle to relax the lip inward roll, letting more pink show at rest. It does not add volume. It lasts about two to three months, can soften a gummy smile, and often pairs well with 0.5ml or 1ml of filler. Lip filler vs Botox is another frequent question. Botox relaxes muscle. Filler adds structure and hydration. They may complement each other but do different jobs.
As for lip filler 1ml vs 0.5ml, consider lifestyle and tolerance for swelling. If you need to look camera-ready within 72 hours, 0.5ml is the safer choice for a first session. If your schedule allows five to seven days for the lip filler swelling stages to pass, 1ml delivers more obvious change. Some clients build from 0.5ml to 1ml with a lip filler touch up four to six weeks later, which often yields smoother integration and less dramatic swelling.
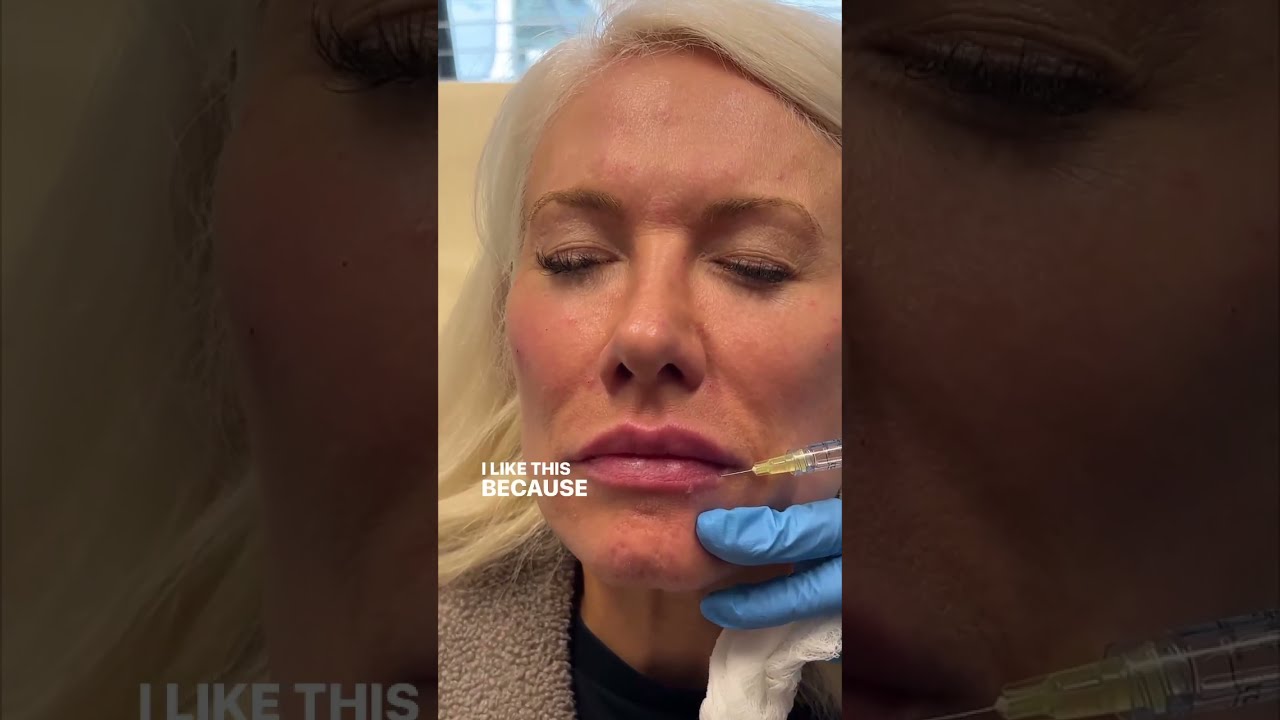
What the appointment feels like, step by step
If you search “lip filler near me,” you will see plenty of glossy before and after photos. What you cannot see is the process, which should feel calm and unrushed. Here is the typical lip filler procedure in a clinic that prioritizes safety and detail.
- Consultation and planning. We review medical history, allergies, past lip filler experience, and specific concerns. Photos from your camera roll help translate taste. I explain likely lip filler effects, risks, and what to expect day by day. Preparation. We clean thoroughly and apply topical anesthetic for 10 to 20 minutes. Some fillers include lidocaine in the syringe, which eases discomfort during placement. Placement. I map the lips, decide on needle versus cannula for each area, and add small aliquots while checking symmetry in a handheld mirror. You will feel pressure, a few sharp pinches, and occasional watering of the eyes. It is brief and manageable. Settling and recheck. We clean again, apply a cool compress, and I review early aftercare. You will see immediate shape change plus swelling. This is not the final lip filler results timeline. Photos and scheduling. We take lip filler before and after photos for your record and plan a follow up. I prefer to review at two weeks, when swelling has resolved.
Pain level, downtime, and the swelling timeline
Pain varies with individual sensitivity, filler type, and whether a nerve block is used. Most clients describe the lip filler pain level as a 3 to 6 out of 10 during injections, with brief spikes. Within an hour, it subsides to tenderness. The first night, the lips often feel full and warm. That is normal.
The lip filler swelling timeline tends to follow a pattern. Day 1 brings immediate fullness and some unevenness. By day 2, swelling peaks, often with the upper lip looking bigger than intended. Day 3 brings bruising into the mix, and the lips can feel lumpy. Day 4 to 5, swelling falls sharply. By day 7 to 10, most people see the true shape. If you still notice lumps at two weeks, gentle lip filler massage may help, but only after your injector confirms it is appropriate. Avoid aggressive manipulation early on.
Bruising varies. I have seen zero bruises in one client and a painter’s palette of purples in another, despite identical technique. Factors include vascular pattern, medications, and how still you can stay during treatment. Simple measures help, like avoiding aspirin, high-dose omega-3, and alcohol for 24 to 48 hours pre and post, if your doctor approves. Arnica can lessen bruising for some, but evidence is mixed. Cold compresses are consistently helpful.
Safety, risks, and what can go wrong
Hyaluronic acid lip fillers are reversible with hyaluronidase, which is comforting if you dislike the look or develop a complication. Still, prevention beats correction. Lip filler side effects are usually minor, like swelling, bruising, and tenderness. Risks include persistent lumps, asymmetry, filler migration above the lip border, cold sores reactivation if you carry HSV-1, and, rarely, vascular compromise. The latter is the reason you want an experienced injector who understands anatomy and has hyaluronidase on hand. Vascular events are urgent but treatable when recognized quickly. If you experience escalating pain, blanching, or mottled skin changes after treatment, call your practitioner immediately.
Lip filler gone wrong most often involves overfilling, poor technique near the philtral columns, or repeated top ups without allowing the product to integrate. Another cause is chasing the lip line excessively, which can create a shelf or migration. If you notice a blurred, puffy border months after multiple treatments, dissolving and a reset can restore crispness. It is frustrating in the short term, but it returns you to a clean canvas.
Cost, longevity, and maintenance in the real world
Lip filler cost varies widely by geography and clinic, ranging roughly from the low hundreds to over a thousand per 1ml in major cities. Price reflects not only the syringe but the expertise, time, and aftercare. One important detail: you are paying for a result, not a volume number. If your injector recommends 0.7ml for a target look, the fee should align with the plan discussed, not an incentive to use the entire syringe if it is not needed.
Longevity depends on product choice, metabolism, and lip movement. Most clients see a soft fade between 6 and 12 months. Light hydration fillers may settle at the shorter end. Firmer products can last longer in some areas, yet you do not want a stiff upper lip at month nine simply to chase duration. A good rhythm for lip filler maintenance is a review at six months, with a possible 0.3ml to 0.7ml top up if you want to maintain definition and hydration. If you prefer a more dramatic look, expect to revisit in the 6 to 9 month window. Your body, your taste, and your budget should guide the schedule.
Before and after, with realistic expectations
Lip filler before and after images can be inspiring and misleading at the same time. Angles, lighting, and even lip balm can exaggerate shine and volume. The most useful comparison includes front-facing, side profile, and a natural smile. Look for integrity of the cupid’s bow, softness of the philtral columns, smoothness of the lip line, and how the bottom lip relates to the top. A balanced result usually shows the bottom lip slightly fuller than the top, about a 1.6 to 1 ratio, though individual faces vary. If your model photo shows a very rolled-out upper lip and heavy shadow below the nose, that may require more than 1ml or a staged plan.
Clients often text me at day two, worried the top lip is too big. By day seven, they usually love the contour. The lip filler healing time includes a slightly bumpy phase where small beads can be felt. These settle as the filler integrates. If a small lump persists, a touch of massage or a micro-dose of hyaluronidase at follow up can smooth it.
Aftercare that actually matters
Most aftercare advice is common sense. Keep lips clean and moisturized, avoid heavy makeup for 24 hours, and no strenuous workouts or saunas for a day or two. Skip dental treatments and lip waxing for one to two weeks, both to avoid bacteria and pressure. Elevate your head the first night and use a wrapped ice pack for short intervals. Hydration helps. So does not poking at your new shape.
Some clients ask about lip filler massage. Unless directed by your injector, avoid deep massage in the first week. After swelling has settled, targeted, gentle pressure can help distribute small irregularities if advised. Do not attempt to squish a lump without guidance. It is easy to bruise.
If you are prone to cold sores, prophylactic antiviral medication can prevent a flare. Be upfront about your history during the lip filler consultation, and start the medication a day before treatment if recommended.
Natural look versus dramatic results
Taste varies. A natural lip filler look keeps the philtrum columns visible, maintains the natural curve of the upper lip, and honors the ratio between top and bottom. Dramatic results emphasize projection and vertical height, sometimes at the cost of softness in motion. The challenge with a dramatic upper lip is function. It must still seal for speech and eating. If your upper lip already tucks under during a smile, a modest lip flip with a small filler volume might show more red without requiring heavy product. If you want strong projection that balances a pronounced nose or chin, that may be an appropriate aesthetic choice, just plan a staged approach with space between sessions to avoid migration.
Symmetry, proportion, and the rest of the face
Lips live within a context. If your chin is recessed or your midface is very flat, 1ml in the lips can draw attention to the center of the face in a way that feels off. Sometimes a tiny adjustment elsewhere, like a chin filler or dental alignment, unlocks better lip aesthetics. Within the lips, asymmetry is normal. Perfect mirror halves rarely exist. Aim to correct meaningful deviations. Over-correcting small asymmetries can look artificial in motion.
Teeth show affects lip planning too. If your top incisors dominate your smile, a large upper lip might collide lightly with them when you speak. If your lateral incisors sit back, extra lateral lip filler can collapse into that space. These subtle oral details change technique and placement.
Lip filler alternatives and adjuncts
If your goal is smoother lip lines but not volume, low-density HA placed superficially can hydrate, while energy-based devices or microneedling around the mouth can improve collagen. For those nervous about filler or healing time, a simple medical-grade lip balm and mild retinoid around the lip border (not on the pink) improves texture gradually. For strong smoker’s lines, a pinch of Botox can reduce vertical puckering, used carefully to preserve function. All of these can support lip filler results or act as standalones if you are not ready for injections.
When dissolving or adjusting makes sense
Preferences change. If you feel your lips look heavy, migrated, or uneven months after treatment, hyaluronidase can dissolve HA filler. Dissolving often reveals that the lip underneath is smaller than you remember, because you have adjusted to the filled look. I advise giving yourself one to two weeks post-dissolving before any new treatment, both to clear residual enzyme and to recalibrate your eye. Correction is not a failure, it is part of responsible lip filler care.
What to ask during your consultation
The consultation sets expectations and reduces surprises. Bring a short list of priorities and a sense of your tolerance for downtime. The most useful questions keep the focus on safety and realism.
- Which lip filler types do you use for border, body, and hydration, and why would you choose one for me. What lip filler techniques will you use for my anatomy, and what are the trade-offs. What lip filler swelling timeline should I plan for, and how will you help if I bruise significantly. How do you manage complications, including vascular events, and do you stock hyaluronidase on site. If I prefer a subtle look, can we stage 0.5ml to 1ml with a lip filler top up after a few weeks.
You want answers that reference your specific lips, not a script.
Results timeline at one week and one month
At one week, most swelling has subsided, though the lips can still feel firm. The color often looks brighter, a side effect of improved hydration. Small textural irregularities usually smooth with time and gentle movement. At one month, the filler has integrated with surrounding tissue. This is when lip filler reviews from clients tend to be most positive, because the lips feel like their own again. If something still bothers you at that mark, a small adjustment can refine the result.
Pros and cons, with clear trade-offs
Lip filler benefits are practical. HA draws water for improved lip hydration and resilience. Definition returns to a soft lip line, lip lines smooth, and the cupid’s bow can be shaped again. You control the level of change, from discreet to showy. It is reversible and temporary, which is good for first-timers.
There are cons. Swelling and bruising can disrupt your week. Maintenance is real. Overuse or poor technique can lead to migration or stiffness. Costs add up over time. The risk of vascular complications exists, even with the best hands, though it is rare and manageable with prompt care. None of these are reasons to avoid treatment, but they are reasons to choose your injector carefully and to respect your own limits.
How to choose a practitioner and a plan
Credentials matter, yet outcomes hinge on an eye for proportion and a conservative, safety-first mindset. When searching “lip filler near me,” scan portfolios for variety. Do you see only one style of lip. Do mature lips look honored, not overstuffed. Do thin lips remain elegant rather than ballooned. Ask about product selection, dissolving, and follow-up policy. A practitioner who encourages staged treatment and welcomes questions is a good sign.
A sensible plan for a first-timer who wants a natural look might be 0.7ml to 1ml with a two-week review and a small touch up at six to eight weeks if needed. If you crave more volume, expect a second session after at least four weeks. Respect time between appointments. It allows tissue to adapt and keeps results crisp.
A grounded guide for the first week
Day 0: Fullness and pressure. Keep lips clean, skip makeup, ice briefly, sleep with your head elevated.
Day 1 to 2: Swelling peaks. Expect asymmetry and a top lip that looks bigger than intended. Continue gentle icing. Do not panic-text your injector unless you see unusual pain, blanching, or significant temperature change.
Day 3 to 4: Bruising shows. Switch from ice to gentle warmth if bruises are tender. Light makeup okay after 24 hours if skin is intact.
Day 5 to 7: Swelling drops fast. Shape emerges. Dryness is common, use a simple, unscented balm.
Day 14: True result. Evaluate with front and profile photos under natural light. Schedule any small adjustment.
Myths, facts, and the middle ground
Myth: Filler stretches the lips permanently. Fact: Temporary fillers do not inherently stretch tissue when used appropriately. Chronic overfilling can stress the skin, but normal, cyclical treatments do not.
Myth: Filler always migrates. Fact: Migration is often due to technique, product choice, lip movement patterns, or repeated top ups too soon. With careful planning and rest between sessions, migration risk is low.
Myth: More product lasts longer. Fact: Beyond a certain point, extra volume can increase complications without meaningful longevity. Quality of placement matters more than quantity.
Myth: You can’t exercise for a week. Fact: Most people resume light activity after 24 to 48 hours. High-heat environments and intense workouts early on can worsen swelling, so ease back gradually.
Final thoughts from years of lip work
The best lip filler outcomes are built on restraint, anatomy, and honesty about trade-offs. One milliliter is a useful, common starting point, not a rule. For many, 1ml yields a soft, hydrated, contoured lip that looks like you on a good day. For some, 0.5ml is perfect. For others, a staged 1.5ml, split over two visits, delivers their preferred fullness with fewer side effects and better longevity.
If you are on the fence, bring The original source reference photos and your real-life constraints to a thorough lip filler consultation. Ask to see lip filler before and after images that match your starting shape, not just your wish image. Plan for the lip filler swelling stages, set your schedule accordingly, and give the result time to settle before you judge it. Your lips work hard every day. Treat them with patience, and they tend to reward you with a result that wears well in photos and in the mirror at 7 a.m.
When done thoughtfully, lip filler treatment is less about chasing size and more about restoring or enhancing the language of your face. One milliliter can speak clearly when placed with care.